
Laptop RAM Upgrade Guide: Check Compatibility First
Nothing kills a “quick” laptop speed boost faster than buying the wrong RAM-only to discover it won’t fit, won’t boot, or gets capped to slower settings by the system. Laptop memory upgrades aren’t just about capacity; they’re constrained by your motherboard, CPU memory controller, BIOS/UEFI limits, slot count, form factor, voltage, and even the rank and timing rules your laptop quietly enforces.
Get compatibility wrong and you risk wasted money, instability, random crashes under load, or a machine that powers on to a black screen. Get it right and the payoff is immediate: smoother multitasking, fewer memory bottlenecks, and faster real-world performance in the apps you actually use.
In this guide, we break down how to identify your exact RAM type and physical form factor, explore the nuances of capacity limits, supported speeds, dual-channel pairing, and module rank/voltage quirks, and provide a framework for choosing and installing an upgrade that’s safe, repeatable, and guaranteed to work-before you spend a cent.
Identify Your Laptop’s RAM Type (DDR3/DDR4/DDR5), SO-DIMM Form Factor, and Maximum Supported Capacity
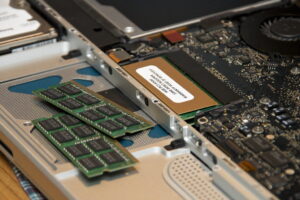
To identify DDR generation and SO-DIMM vs soldered RAM quickly, start with the OS and confirm with a physical check: Windows users can run “Task Manager → Performance → Memory” (often shows DDR speed and slots used), while Linux users can use dmidecode -t memory for module type and part numbers. If the system reports “LPDDR4/LPDDR5” or shows zero available slots, that’s typically onboard memory-no upgrade path-so you’re limited to buying a higher-RAM configuration instead. When an access panel is available, the module will almost always be a laptop-sized SO-DIMM; desktop DIMMs won’t fit, and most ultrathins use soldered LPDDR to save power and space.
For the most reliable answer on DDR3/DDR4/DDR5 and the maximum supported capacity, correlate three data sources: motherboard/BIOS limits, CPU memory-controller limits, and what the vendor actually validated. Pros doing refurbishment or fleet upgrades will confirm SPD details with CPU‑Z – reads module SPD tables and HWiNFO – exposes chipset and slot topology, then cross-check the laptop’s service manual for slot count and per-slot ceiling (for example, “2 slots, 32 GB max” often means 2×16 GB). If only a part number is visible, plug it into the RAM maker’s lookup tool (Crucial, Kingston, Samsung) to confirm DDR generation and rank/layout compatibility-this is where mismatches happen even when frequency “looks right.”
In an integrated workflow, push these checks into automation: inventory tools in managed environments can pull SMBIOS memory fields, flag non-upgradable LPDDR systems, and predict the best capacity target based on app telemetry rather than guesswork. For mixed hardware fleets, Microsoft Intune – centralizes hardware inventory signals and PDQ Inventory – queries RAM/slot data at scale help you standardize on a few vetted SO-DIMM SKUs and avoid one-off purchases. The practical win is avoiding “boots but unstable” scenarios-wrong voltage era (DDR3L vs DDR3), incompatible high-density modules on older controllers, or exceeding BIOS limits-even when the module physically fits.
Verify Real-World Compatibility: CPU/Chipset Limits, BIOS/UEFI Support, and Dual-Channel Pairing Best Practices
Start with the hard limits: your CPU’s integrated memory controller (IMC) and the platform chipset decide the maximum capacity, supported DDR generation, rank density, and achievable data rate-often below what the SO-DIMM label advertises. Consumer-level checks are fast with CPU-Z – reads SPD and slots and Crucial System Scanner – suggests compatible modules, but I still validate against the OEM service manual because many laptops cap memory via firmware tables even when the silicon could go higher. For pro-grade confirmation, I pull the memory map and SMBIOS tables using HWiNFO – exposes BIOS-reported memory topology and cross-check that against the CPU spec sheet to avoid the common “boots at 4800 but trains down to 4000” surprise.
BIOS/UEFI support is where paper specs die: some systems require a BIOS revision to recognize higher-density DDR5 ICs, and others block XMP/EXPO entirely, forcing JEDEC-only operation even with premium sticks. Before buying, verify the vendor’s RAM QVL (when available), then confirm current firmware and microcode status with Lenovo Vantage – automates BIOS and driver updates or Dell Command | Update – validates OEM firmware packages, because stability on modern workflows hinges on reliable memory training, not peak MHz. In integrated ecosystems, endpoint tools like Microsoft Intune – enforces update compliance at scale can schedule firmware windows so your upgrade doesn’t collide with BitLocker policies or managed boot settings.
For dual-channel pairing, prioritize matched capacity and organization (same GB, same DDR gen, ideally same rank) so the controller can interleave cleanly; mixing a 16GB single-rank with a 32GB dual-rank often forces “flex mode” where only part runs dual-channel. Practical observations from this quarter’s remote-workstation rollouts show that identical modules reduce training retries and cold-boot delays, and you can confirm channel mode and ranks after install using MemTest86 – catches instability under load and Windows Task Manager – shows channel and speed basics. If you’re tuning for predictable latency in AI-assisted IDEs or real-time data dashboards, aim for two identical SO-DIMMs at the highest stable JEDEC speed your BIOS will hold across sleep/wake cycles, not the highest number printed on the box.
Choose the Right Specs: Speed (MHz), Timings, Voltage, and XMP/EXPO-What Laptops Actually Use
For laptops, the only RAM specs that reliably matter are the ones your platform will actually apply: the memory generation (DDR4 vs DDR5), the module type (SO-DIMM vs soldered), and the speed/timings the CPU’s memory controller accepts at your installed capacity. Consumer checks are fast now-use CPU‑Z – reads SPD/XMP profiles and HWiNFO – confirms live memory clock and gear/mode, then verify the advertised “MHz” is really MT/s (DDR transfers per second) and that the system will downclock mismatched sticks to the slowest common profile. Practical observations from this quarter’s upgrade tickets show most “won’t boot” cases aren’t bad RAM-they’re DDR4/DDR5 mix-ups, single-rank vs dual-rank expectations, or buying XMP-only modules for laptops that never expose XMP in firmware.
Speed (e.g., DDR5‑5600) is only half the story; latency is the other half, and laptops often prioritize stability and battery over aggressive timings. Pro validation is where the truth shows: PassMark MemTest86 – catches marginal bit errors and AIDA64 Engineer – measures real latency/bandwidth, revealing that a “faster” kit can perform worse if the laptop forces looser timings or a different controller mode at higher densities. Voltage is the silent constraint-DDR4 SO-DIMMs are typically 1.2V (some XMP bins expect more), DDR5 uses on-module PMIC behavior and usually 1.1V nominal, and many thin-and-light boards simply refuse any profile that asks for extra voltage headroom.
XMP/EXPO is where expectations diverge from desktops: most laptops ignore XMP/EXPO and run JEDEC defaults, so buying “gaming” RAM only helps if your BIOS explicitly supports it (rare outside a few performance lines). Integrated workflows make this painless: snapshot current SPD data, match the laptop’s supported JEDEC bin, and let asset tracking or procurement rules block incompatible SKUs-Microsoft Intune – standardizes fleet hardware compliance and PDQ Deploy – automates post-upgrade validation scripts-so every machine ends up on a known-good speed/timing/voltage target without guesswork. If you want a simple buying rule that aligns with what laptops actually use, prioritize same generation + same capacity + JEDEC-rated speed your CPU/board supports, and treat XMP/EXPO as a “nice if supported,” not the reason to purchase.
Install and Validate the Upgrade: Safe Access Steps, Post-Upgrade Memory Testing, and Troubleshooting No-Boot Issues
Power down fully (not sleep), unplug AC, and disconnect the battery if your model allows; then discharge static and stage screws so nothing bridges contacts when you reseat the SODIMM. For consumer-level confirmation before you close the bottom cover, scan the module label with your phone and cross-check the exact part number in the vendor app, while Crucial System Scanner – confirms laptop RAM specs fast. On the pro bench, I also validate the slot and SPD readout using CPU-Z – verifies SPD timings/voltage.
First boot after the swap: expect a longer POST while the firmware trains memory; once in the OS, confirm total capacity, speed, and channel mode, then run a structured test rather than “it boots, so it’s fine.” Practical observations from this year’s workflows show that intermittent faults surface under sustained, mixed workloads, so use MemTest86 – catches subtle bit errors and back it with HWiNFO – logs temps and memory clocks. For integrated ecosystems, schedule an overnight validation run and automated log capture with Windows Task Scheduler – automates repeatable diagnostic runs.
If you get no boot (black screen, fans spin), treat it as a seating/compatibility/firmware triage: remove AC, hold power 15 seconds, reseat one module at a time, and test each slot to locate a bad stick or marginal socket. When POST won’t complete, clear the BIOS/CMOS per your service manual and update firmware once stable, because some platforms need newer microcode for higher-density ranks; Lenovo Vantage – simplifies BIOS and driver updates. If you reach OS but face crashes, revert XMP/overclock settings, match modules by capacity and rank where possible, and re-run diagnostics before blaming the motherboard.
Common Questions
- How long should memory testing take after an upgrade? Plan for at least one full MemTest86 – catches subtle bit errors pass (often 1-4 hours), and longer if you upgraded to very high capacity.
- Why does my laptop show the new RAM but at a lower speed? Many laptops cap SODIMM frequency to the CPU/iGPU platform limit or run at JEDEC defaults, especially when mixing modules with different SPD tables.
- My laptop won’t boot with two sticks but boots with one-what’s the usual cause? Most often it’s a seating issue, a mismatched rank/voltage profile, or a borderline slot; isolate by testing each stick in each slot and then updating BIOS once you have a stable baseline.
Disclaimer: Laptop disassembly can cause injury or device damage-follow the manufacturer’s service guidance and proceed only if you’re comfortable with electronics safety.
Q&A
1) How do I confirm my laptop’s RAM is actually upgradeable before I buy anything?
Check three things: service manual (or your exact model’s specs page), physical access (bottom cover + SO-DIMM slots), and current RAM layout.
In Windows, use Task Manager → Performance → Memory to see “Slots used” and “Form factor.” If it shows 0 available slots and the model is known for soldered memory, you may have no upgrade path.
On many ultrabooks, RAM is soldered; on many business laptops and gaming models, at least one SO-DIMM slot is available.
2) What compatibility specs matter most (DDR type, speed, capacity), and what happens if I mismatch them?
Prioritize in this order: DDR generation (DDR3/DDR4/DDR5 must match), form factor (laptops almost always use SO-DIMM), and maximum supported capacity (per slot and total, set by the laptop’s memory controller/BIOS).
Speed is more flexible: if you install faster RAM than supported, it typically downclocks to the laptop’s supported rate-no harm, just no extra speed.
Mixing capacities and brands usually works, but for best stability/performance, aim for matched modules (same size and specs) to maximize dual-channel operation.
3) My CPU “supports” more RAM than my laptop spec sheet-who’s telling the truth?
The laptop spec sheet (and service manual) wins in practice. The CPU may support higher limits, but the laptop’s BIOS/firmware, motherboard design, and validated configurations can cap usable RAM below the CPU’s theoretical maximum.
Some laptops can exceed the published limit after BIOS updates, but treat that as a bonus-not a guarantee. If you need certainty, look for:
manufacturer maximum, community confirmations for your exact model, and whether the latest BIOS notes mention memory compatibility improvements.
Key Takeaways & Next Steps
Compatibility is the quiet gatekeeper of every successful laptop RAM upgrade: the right capacity, the right generation, the right speed profile, and the right form factor-matched to what your system actually negotiates at boot-not what a storefront headline promises. When you treat the upgrade as a fit-and-function check rather than a shopping decision, you avoid the most common pitfalls: downclocking, single-channel performance loss, and modules that simply won’t train.
Expert tip: before you buy anything, do a quick “two-source verification” using (1) your laptop’s official service manual or vendor memory list and (2) a readout from a trusted hardware tool (e.g., SPD/slot info, current timings, and installed configuration). Then purchase the highest-density sticks your model supports while keeping the layout practical-prefer 2× matched modules for dual-channel on machines with two slots, or a single larger module only when one slot is soldered and you’re maximizing the replaceable slot. This approach not only boosts performance today; it also keeps your upgrade path flexible for future workloads like heavier browser sessions, creative apps, or local AI tools that are steadily becoming “normal” laptop tasks.

is a hardware analyst and PC performance specialist. With years of experience stress-testing components and tuning setups, he relies on strict benchmarking data to cut through marketing fluff. From deep-diving into memory latency to testing 1% low bottlenecks, his goal is simple: helping you build smarter and get the most performance per dollar.